2 nov 2014, last update: 30 Jan 2022
User friendly developing in Sitecore
Sitecore is an ideal product to manage complex websites. For the less technical in content and marketing-oriented CMS editors it is a bit complex to understand the custom made things.
Here we can help by implementing a few things on a user friendly manner. That is also nice for the tester and other developers to find quickly the way in the created page templates and components.
It takes some time to make a beautiful and user-friendly Sitecore CMS environment. But at the end a user friendly Sitecore implementation save time and makes it fun to work with. Be nice to the editors, the user friendly cms implementation help to use the things as they are intended.
Use help texts
For a Field value you can set a long and short description and a URL in the data template. Fill in the Help section of your templates
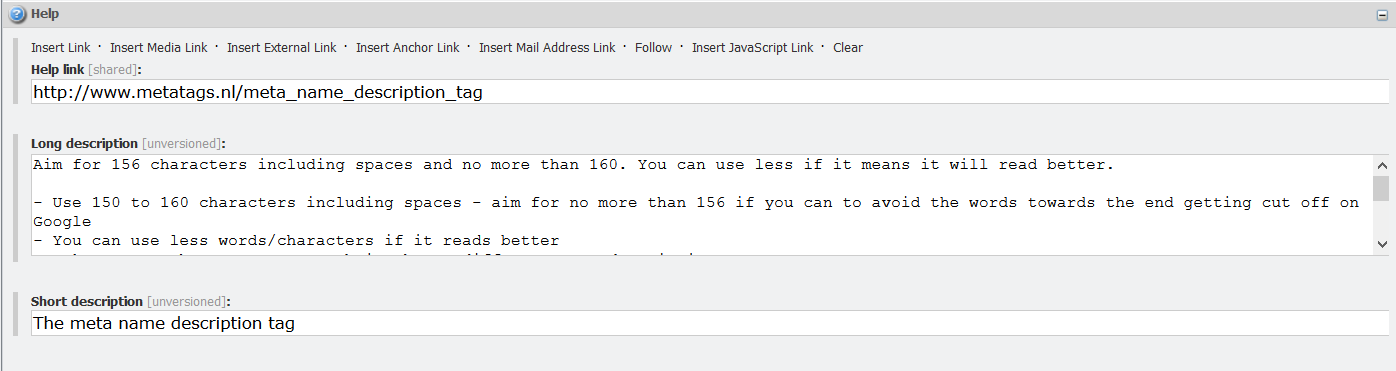
The help section in a Sitecore template.
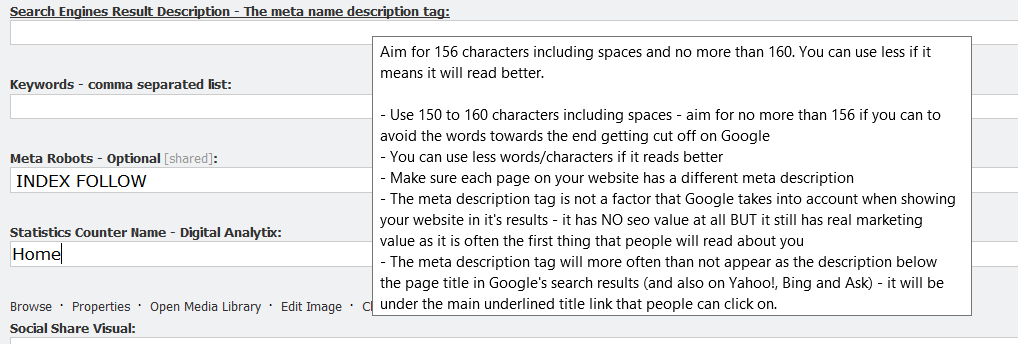
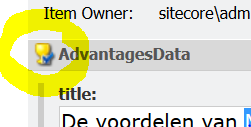
The result of filling in the Help section for a field template.
The result of a Short description Help text on a page template. Note this item is also protected and shows a content editor warning about protected.
Use Hide and Protect
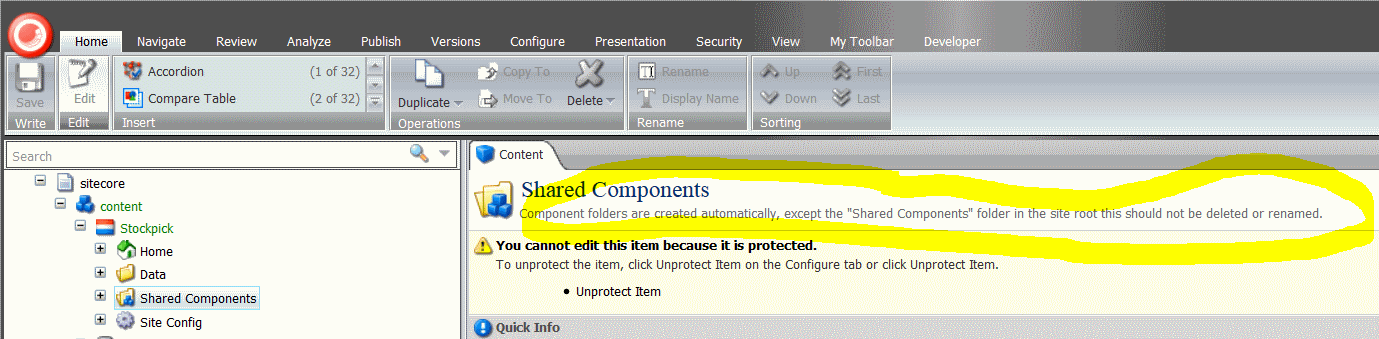
You can Hide or protect an item in Sitecore. For example hide the media folder where you store your technical media, such as layout images.
Protect items that should not be edited or deleted. For example a Shared Component folder.
Create Custom Content Editor Warnings
For example use the Language Content Editor Warning. With this module you get a content editor warning when the wrong language is selected. And a user friendly link to change the language.
Download on the Sitecore Marketplace Sitecore Language Content Editor Warning and see the Dutch article Editen in de juiste taal
Or maybe you can use a Content Editor Warning to create a multiple field validation.
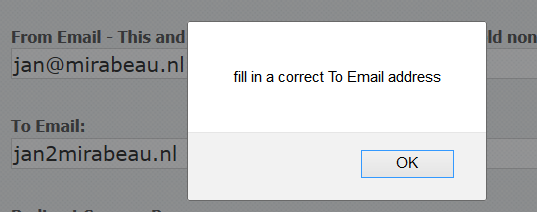
Field Validation
Use field validation, this will also work in the page editor. For a field you can fill in a regex and a validation message.
Using Default Value
For a Field value you can set a Default value. When a user creates an item based on a data template this default value will populate in the item. You can also use tokens.
- $name: The name for the new item entered by the user
- $id: The ID of the new item
- $parentid: The ID of the parent of the new item
- $parentname: The name of the parent of the new item
- $date: The system date in yyyyMMdd format
- $time: The system time in HHmmss format
- $now: The system date and time in yyyyMMddTHHmmss format
Create your own Default value token
It is possible to create your own token a good example is the future date.
initial field values for sitecore setting a default future date
Icons
Use icons for your templates and Template section.
In Sitecore 8 The Section Image will not be shown.
Insert options
Use insert option, with insert option you define a list to present for adding a child. You can also add a branch templates as insert option.
See John West Sitecore blog all about insert options in the sitecore aspnet cms
Insert options are also used by the page editor for the insert page button.
Insert Options Rules
Instead of insert option you can also use insert option rules see. Sitecore Insert Options Rules
Branch templates
Use branch templates to create multiple pages at once.
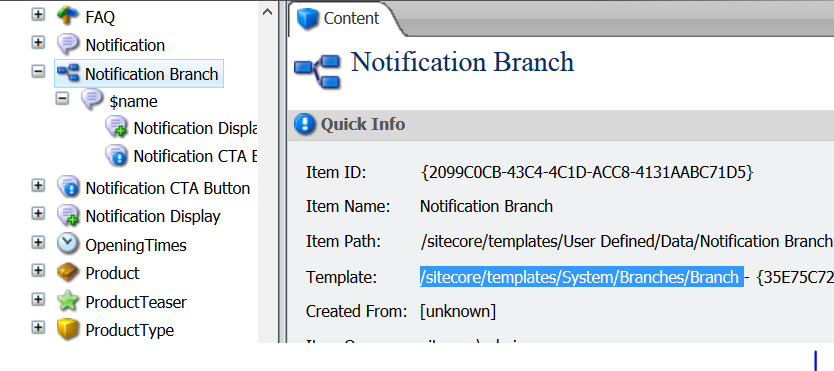
Example of a Branch, use this “Notification Branch” item as insert option. By creating a ‘Notification Branch” you get the defined structure. A item with the defined subitems.
See this video about Branch Templates https://www.youtube.com/watch?v=vH0rfbJXovc
Data Field Type
Use the Field type that best fit. You can make your own or find a good one on the marketplace.sitecore.net use the source field, and use query’s in the source field. Sitecore does not have the best data field types compared to other CMS's. So there is work to do. Field orders and names should be appropriately defined. This makes the CMS also more user-friendly.
Custom buttons
You can make your own commands and add buttons to the top Ribbons or the Context menu’s
See the core database
/sitecore/content/Applications/Content Editor/Ribbons/Chunks/
And
/sitecore/content/Applications/Content Editor/Context Menues/Default/
Or read the following Dutch Article. Dialoge box in een command
Login welcome title
On your DTAP: Development, Testing, Acceptance and Production. Environment you can set a custom title on the login page,
<setting name="WelcomeTitle" value="Welcome to Sitecore - DEV" />
In Sitecore 8 there will probably be a different login screen, it is not yet adjustable in the config
Adding additional information to the Sitecore login page. The login screen is also a nice place to put Information about the current version of your website. You can add a custom message to the right bar of the login screen. By creating a pipeline processor.
<configuration>
<sitecore>
<pipelines>
<getAboutInformation>
<processor type="Yourwebsite.Pipelines.About, Yourwebsite" />
</getAboutInformation>
</pipelines>
</sitecore>
</configuration>
Or use the Sitecore Partner AboutInformation Module from Robbert Hock. Sitecore Partner AboutInformation Module
With this module you can also set a message in the “About” from the top menu.
In Sitecore 8 the Login screen is changed the about is working in Sitecore 8, but the LoginPageText is not displayed. See Sitecore 8 help wheres license information
Chang the background picture in Sitecore 8 can also be done by config.
<!-- LOGIN BACKGROUND IMAGE URL
Sets the background image used on the login page /sitecore/shell/default.aspx
Default value: "//"
-->
<setting name="Login.BackgroundImageUrl" value="/sitecore/login/drop_wallpaper.jpg"/>
<setting name="Login.DisableLicenseInfo" value="true"/>
<!-- LOGIN DISABLE LICENSE INFROMATION
If true, Sitecore hides the "License Information" link on the login page.
Default: true
-->
Background in Desktop User Interface.
You can add custom desktop backgrounds see sitecore tip set custom background
Events.
Sitecore has a lot of Events where you can add your own custom handler. For example you can subscribe to the item:added event and set the Sort order if a specific template is added.
Locking options.
Default a editor must lock an item. This is defined in the web.config
<!-- REQUIRE LOCK BEFORE EDITING
If true, the user must have a lock on a document before
he can edit it, otherwise it is always ready for editing
-->
<setting name="RequireLockBeforeEditing" value="true"/>
Locking and don’t check in is one of the most annoying thing for editors. But there are a lot of thing you can do about that. Or set RequireLockBeforeEditing to false.
See the Dutch article Sitecore Locked items
The Experience Editor, The Page Editor
The Experience Editor the former page editor will be discussed in the next part of the user friendly developing in Sitecore.
Part 2: User friendly developing with the Sitecore Experience Editor