Created: 28 Nov 2022, last update: 24 Nov 2025
Implement Sitecore's switch Solr indexes strategy on SearchStax
Originally Sitecore used Lucene as a indexing service; however, a disadvantage of this service is that the indexes were stored on disk. Each web instance, like the cm and the cd roles, had their own index on disk. Occasionally, these indexes were out of sync as they were managed by the running web instance. To avoid indexes being out of sync, Sitecore introduced Solr as the default indexing service to replace Lucene. Solr is a separate scalable web service that can be used to manage indexes from a central location.
While rebuilding an index, Lucene and Solr both remove the existing index and start building the new index from scratch. In environments with a lot of data, rebuilding the index can take a long time. During the rebuild process, pages that depend on data from this index, such as search or news lists, cannot access the data. As a result, content appears to be missing from the environment. This is unwanted behavior in some cases and can lead to many concerned questions from content authors. To ensure that content is available during indexing processes, it is possible to implement the switch Solr indexes strategy as described on Sitecore’s documentation website.
For a client of uxbee, we created several API’s that rely on data from Solr indexes. To ensure that the data is always available, we decided to implement the switch Solr indexes strategy. Since this strategy had already been described by Sitecore, it should be obvious how to implement, right? Wrong! This particular client is running Sitecore on Managed Cloud based on containers. The Solr part of managed cloud is based on Sitecore Solr Managed Service of SearchStax, which is based on SolrCloud. I got to work implementing the strategy by reading many different blogs and articles. Sometimes these were outdated, sometimes not fitting Sitecore or SearchStax. While reading, every now and then I did find a piece of the puzzle. Based on my research, I dare say that implementing this strategy on SearchStax was undocumented. Now I want to bring it all together in a how to implement Sitecore’s switch Solr indexes strategy on SearchStax. It includes everything from my research and all the steps to set up automatic deployment to manage both local and Sitecore Managed Cloud on Containers with SearchStack.
Switch on Rebuild strategy
With the switch on rebuild strategy, you set Solr to rebuild an index in a separate core so that the rebuild does not affect the search index currently in use. Rebuilding an index is not often necessary. Think of situations such as new fields being added to the index or a calculated field logic that has changed or an index that is out of sync with the database. Often these issues can also be resolved if you know what items are affected. That is not always clear, so it is much easier to rebuild the index as a whole. With SwitchOnRebuild, you can rebuild an index without worry, but it will cost you some extra disk space on the Solr server per index. To keep disk space within acceptable limits, I chose to implement this strategy only to web indexes, this is where it makes the most sense. To get started, I created an example patch file for containerized development that applies the SwitchOnRebuild strategy to web databases (including the SXA web index).
Access to Solr
Later in this blogpost I will create the new collections needed for the switch on rebuild strategy. To make sure everything is created correctly, I want to have access to my Solr instance. While there is documentation to accomplish this, it is a bit scattered. I have briefly described how to access your Solr instance on the different environments.
The documentation of Sitecore describes how to access Sitecore containers. The Solr container is exposed via port 8984. This is configured in the standard Sitecore docker-compose.yml. Therefore, you can easily access your local Solr container via http://localhost:8984.
Accessing a Solr container on Sitecore’s Managed cloud is not as easy as accessing your local Solr container. There is an additional layer of security that you need to consider when accessing SearchStax Solr instance.
First, you need to locate the credentials and URL in Azure Key Vault. You can do this by coping the secret from the solr-connection-string or take the “Sitecore_ConnectionStrings_Solr.Search:” environment variable from your running cm pod. Here you will find a URL that looks something like this: https://username:password@ss12345-ab12abcd-westeurope-azure.searchstax.com/solr;solrcloud=true. Copy the username and password and save them for later use. Remove the username, password and @-sign from the URL and replace “;solrcloud=true” with “/”. This will give you a URL that can be used to access your Solr Instance on Managed Cloud. To access the Solr instance, you must first provide the credentials you saved earlier.
Creating Collections by using the Solr-init container
You do NOT want to manually create the collections in your Solr UI as described on SearchStax’s documentation site, as this does not fit into an Infrastructure As Code strategy. Therefore, the collections must be created automatically. The Solr-init container is the best place, from here Sitecore creates all indexes.
Creating custom collections is just as easy, just place a json file in the data folder of the solr-init container. You can do this by creating or modifyinf the docker\build\solr-init\Dockerfile. When you install SXA, you need to add a file to this folder, as explained in add Sitecore modules to a container. I have created a json file called cores-SwitchOnRebuild.json and placed it on GitHub, you can also copy the contents below:
{
"sitecore": [
"_web_index_rebuild",
"_sxa_web_index_rebuild"
]
}
To ensure the file is added, you must add the following line(s) to the Dockerfile for the solr-init image:
# Add rebuild cores, on existing installation run the solr-int with SOLR_COLLECTIONS_TO_DEPLOY SwitchOnRebuild, similar to SXA
COPY .\cores-SwitchOnRebuild.json C:\data\cores-SwitchOnRebuild.json
When building the solr-init image for SXA on Managed Cloud, make sure that the base image is designed for use with Searchstax. In the Sitecore image repository, these images have tags ending in -searchstax, for example, sitecore-xp1-solr-init-searchstax. According to the documentation, you can set the SOLR_COLLECTIONS_TO_DEPLOY and add SXA indexes, for example. Setting the value to SXA will load and execute the corresponding json file. I will explain this in more detail later. For creating the rebuild indexes, you can create something similar. I tried this path, but did not get it working in a short time.
Creation of the collections is only triggered when your Solr server has no existing Sitecore or xDB collections. To ensure that the collections are created on an existing setup, you first need to delete all the indexes and configsets before running the solr-init image.
Digging into the Solr-init container
Init containers are designed to perform a task when the environment starts. This means that they have a very short lifetime and abort when their task is completed. This is also the case for the solr-init container. This makes it difficult to view the files on the container via Docker Desktop or Visual Studio. However, you can run a container from PowerShell and open the command prompt via the ENTRYPOINT. This does not stop the container and allows you examine the contents on disk. The PowerShell command looks something like this:
docker run -it --entrypoint cmd scr.sitecore.com/sxp/sitecore-xp0-solr-init:10.2-ltsc2019
When the container starts, the C:\Start.ps1 is executed because it is defined as ENTRYPOINT. To examine the file, open the command prompt and run the command “type Start.ps1”. This prints the start PowerShell script to your screen; you can also use the file explorer for containers in Visual Studio. You can use this code as an example to modify or extend the image functionality.
If you want to make changes to the image, I would not recommend changing the file start.ps1 on the image, as this is managed by Sitecore. Any changes applied by Sitecore in the future will overwrite your changes. Instead, I recommend adding a start-cutom.ps1 file that also executes the out of the box Start.ps1 file. Now you can simply change the ENTRYPOINT to run your custom-start.ps1 file.
Collection Aliases
In Solr, you can work with collection aliases. A collection alias is a virtual collection that Solr treats the same as a normal collection. The alias collection can reference one or more real collections. This functionality can be used when you want to reindex content behind the scenes. This is exactly what you want when you implement the switch on rebuild strategy. Sitecore can create the index aliases for you, by setting the ContentSearch.Solr.EnforceAliasCreation to true.
<settings>
<!-- ENFORCES ALIAS CREATION ON INDEX INITIALIZATION
If enabled, index aliases will be created on Solr during the index initialization process.
Default value: false
-->
<setting name="ContentSearch.Solr.EnforceAliasCreation" value="false" />
</settings>
I did not use this manual functionality, instead I chose to do it in the Solr-init container. The Solr-init container contains a New-SolrAlias.ps1 for this purpose. In my Start-Custom.ps1, I included an example of how to use the New-SolrAlias.ps1. I have included a check to verify if the alias already exists.
How to delete an index
To ensure that indexes can be created on an earlier Sitecore setup, you must first delete the existing indexes first. To delete an index, you must delete the collection and the ConfigSet. Collections can be easily deleted through Solr’s admin interface or through the collections API. The ConfigSets can be viewed in ZooKeeper by opening the URL: http://localhost:8984/solr/#/~cloud?view=tree. It cannot be deleted through the UI. Leaving the ConfigSet causes issues when you need to recreate the collection. You can delete the ConfigSet through the Configsets API.
Deleting indexes from localhost
On your local docker environment, you can clean the data folder for the solr server on your disk. This folder is located at \docker\data\solr. Cleaning this folder removes both the collections and ConfigSets. For deleting a local ConfigSet, try this example for the sitecore_web_index_rebuild_config:
http://localhost:8984/solr/admin/configs?action=DELETE&name=sitecore_web_index_rebuild_config&omitHeader=true.
Deleting indexes from SearchStax Managed Cloud
To delete a ConfigSet from Managed Cloud you can take a look at the SearchStax Client PowerShell restAPI script called accountdeploymentzookeeperconfigdelete .ps1.
The scripts needs some authentication values. You can find the correct value in the Sitecore Managed Cloud Azure Key Vault, see the example below:
$ACCOUNT = "Sitecorexxxx"
$uid = "ss123456"
$NAME="nccae1204hoib2bxi5s_web_index_rebuild_config"
$APIKEY = "eyJhbGciOiJIUzI1NiIsInR5cCI6IkpXVCJ9.eyJpYXQiOjE1NTU2ODk4MzAsImp0aSI6IjEzNGUyNWQ2NGMzNDcxZTcyNjFlOWJmNDEyZjYyZjk5NTA1MjZhNDEiLCKzY29wZSI6WyJkZXBsb3ltZW50LmRlZGljYXRlZGRlcGxveW1lbnPiXSwidGVuYW50X2FwaV8hY2Nlc3Nfa2V5IjoiS2c1K3BJR1pReW1vKzlCTUM2RjYyQSJ9.UJp9PjneR8CozXS8ihoEYF97opeAp8hOIN4ez536y_w"
SearchStax has more detailed information on how to empty a Solr index and on how to wipe a deployment.
Setting the number of replicas
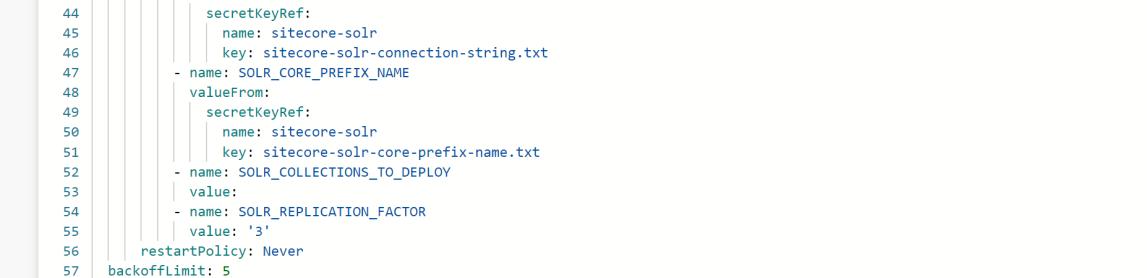
With the Sitecore Manage Cloud SearchStax Solr, you probably have 3 nodes; I had that too. That means that a replicafactor of 3 provides the best practice of high-availability fault-tolerant behavior, using one replica per node. In my production environment, this is also the case, but it was not configured in the pipeline, so every new index or in the case of a removal and reinstallation, this defaulted to 1 instead of 3.
Add the SOLR_REPLICATION_FACTOR with value 3 to the searchstax-solr-init-sxa-spe.yaml to automatically create 3 replicas when creating the index. Adding this will not modify existing indexes. If you want to modify an existing collection, you can easily do it manually in the Solr admin. For your local docker on Solr with the default scripts you have 1 node, you don’t need to change that or add more cores.
The config patch files
You should never change default Sitecore config files, instead use a patch file to change the configuration. The \App_Config\Include\Examples containes an example config for the CM role Sitecore.ContentSearch.SolrCloud.SwitchOnRebuild.config.example. Note that you also need a config file for the CD role, the CD needs a different config for SolrCloud. The switch Solr indexes article describes what configuration is needed.
Keep in mind that there is also a SXA patch on the index config. To ensure that the changes are always applied correctly, the Include/z.Foundation.Overrides folder is a good location to store the config files. Bear in mind that within managed cloud the index prefix name is not equal to Sitecore, it is different on each managed cloud environment, therefore you should use: $(env:SOLR_CORE_PREFIX_NAME).
I have created both files on the Sitecore-SolrCloud-SwitchOnRebuild-Containers GitHub repository. No need to put different files on CD and CM, I applied role- and search-based rule configuration to both files.
With all the above information, you can add indexes to an existing Sitecore Solr Managed Service installation of SearchStax. With my example, you will have the right settings and tools to automatically manage and restore indexes when shit hits the fan.